My apartment bathroom has exactly 4 inches of counter space, so my entire 10-step routine has to fit in a small basket. And honestly? That constraint is probably why my skin looks better now than when I had a shelf full of expensive jars. A budget Korean skincare routine gave me the dewy, glowy skin I used to chase with high-end products, and it cost me less than one trip to the pharmacy for a single fancy serum. I mean it when I say the price tag on skincare has almost nothing to do with how your face actually behaves.
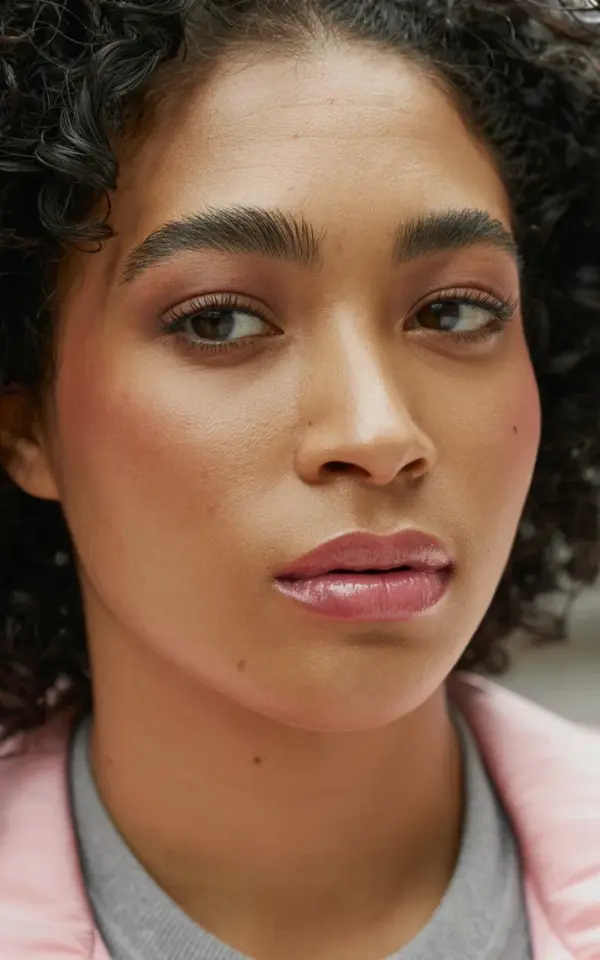
The photo up top shows my real, everyday finish: warm skin with that lit-from-within look, subtle eyes defined by black liner, and a glossy pink lip. No filters, no heavy foundation, no magic tricks. It took me two years of experimenting with cheap products to figure out the order that works, and I am about to give you every single detail.
My Budget Korean Skincare Routine for Glowy Skin That Actually Works
Look, I used to think glow required a $90 vitamin C serum and weekly facials. I was wrong. What my skin needed was hydration in layers, not a single miracle product. The Korean philosophy of building moisture slowly, with thin textures, changed everything for me. And the best part? The products I rely on now are mostly under $15 each.
Here is the thing about affordable K-beauty: the texture matters more than the brand name. A watery toner will penetrate the skin better than a thick, sticky cream that just sits on top. I learned this after buying a rich moisturizer that made me look greasy instead of glowy. The glow you want comes from within the skin, not on top of it.
Layer Light Hydrating Toners Instead of Expensive Serums
My number one cheap trick is skipping the heavy serum and going straight for a hydrating toner that I apply two or three times. I pour a little into my palm, press it into my skin, and wait 30 seconds before the next layer. This is called the 7-skin method in K-beauty, though I usually only do 3 to 4 layers because I have places to be.
A bottle of something like the Hada Labo Gokujyun Premium Lotion (which is technically a toner, not a lotion) costs about $12 and lasts me four months. It has multiple types of hyaluronic acid and urea, which sounds intense but honestly just feels like splashing water on your face. You do not need a $40 serum with gold flakes. You need this.
The trick is applying to damp skin, not dry skin. If you pat this toner on a damp face, the water pulls the humectants deeper. If your face is dry, the toner can actually pull moisture out of your skin. I learned that the hard way after a week of using it wrong and wondering why my face felt tight. Rookie mistake.
The Correct Order of Products for a Natural Glow
Ever put on moisturizer and felt like your face absorbed nothing? That is usually an order issue, not a product issue. I always follow this exact sequence:
– Toner on damp skin (2 to 3 layers, patted gently)
– A watery serum with snail mucin or centella (nothing thick or silicone-heavy)
– A light gel moisturizer or a watery emulsion
– Sunscreen with a dewy finish, always SPF 50
– A few drops of facial oil pressed on top if I need extra glow for a night out
The facial oil is optional, okay. But on days when I want the extra dewy look without makeup, I press a drop of squalane oil onto my cheekbones after sunscreen. It looks like natural light, not grease. Squalane is cheap, about $8 for a small bottle, and a little goes a very long way.
What I do not use: heavy foundation, powder, or matte primers. They fight against the glow. My makeup routine assumes my skincare already did the hard work.
Natural Eye Makeup with Black Liner and Glossy Pink Lips
For the eye look in the photo, I skipped eyeshadow entirely. Yes, completely. I curled my lashes, applied one coat of mascara, and used a black gel liner to tightline my upper waterline. Tightlining is when you wiggle the pencil right into the base of your lashes instead of drawing a line above them. It makes your lashes look fuller without any obvious liner, perfect for a natural makeup vibe.
The eyeliner tutorial part is simple: look down into a mirror, pull your eyelid gently to the side, and dot the liner between each lash base. No smooth swoop needed. If you try to draw one continuous line, it will look crooked. Dots are foolproof. I use a black pencil that costs $6 and it lasts all day without smudging into my lower lash line, which is a miracle because my eyes water constantly.
On the lips, I used a sheer pink gloss with a little bit of tint. The key is to blot it once with a tissue so it looks like a natural flush, not a sticky candy layer. Your natural lip color shows through the gloss, and that peeking-through effect is what makes the whole look feel effortless.
Why Glowy Skin Makes Eye Makeup Look Better
Here is an observation from years of doing my makeup on the bus: dewy skin makes even a minimal eye look seem polished. When your skin has a healthy sheen, a simple black liner and pink gloss look intentional. When your skin is dull, the same exact makeup looks unfinished. The glow does not just change the skin, it changes the whole face.
I noticed this when I switched to a lighter moisturizer and my foundation started clinging to dry patches. The fix was not a better foundation. The fix was a better base. My makeup routine now lasts maybe 5 minutes: curl lashes, tightline, mascara, gloss, done. The skincare is doing 90% of the work.
Another thing nobody mentions: the inside of your lid needs moisture too. I put a tiny bit of toner on my eyelids before doing makeup. It prevents the liner from tugging and minimizes the crepe-y look that appears when you are over 30. It costs nothing extra and makes a visible difference.
Affordable Product Dupes for That Instagram Glow
Let me give you my exact cheap product lineup, because recommendations without names are useless. I currently use the Cosrx Snail Mucin Essence ($15) as my serum, though many people love the Purito Centella Serum at the same price point. My moisturizer is the Illiyoon Ceramide Ato Soothing Gel, which is about $12 and sinks in within 60 seconds.
The sunscreen matters more than any other step, honestly. I use the Skin Aqua Super Moisture Gel Gold, about $13, and it leaves a dewy finish without white cast. On my day off, I sometimes skip moisturizer and just use this sunscreen because it is hydrating enough on its own. Is that bad? Probably. Do I care? It works.
Here is the mildly obsessive part of my routine that I am slightly embarrassed to admit: I keep my toners in the fridge. Not for fancy spa vibes, because my apartment gets hot and the cold liquid helps stubborn morning puffiness around my eyes. A cold toner pressed over closed lids is better than any eye cream I ever tried. I have been doing this for a year and my under-eye area looks brighter.
Simple Habits That Amplify the Glow Without Extra Cost
You cannot budget your way out of a bad diet or poor sleep. The glow in the photo comes partly from skincare, but it absolutely comes from what I drank the day before. I aim for two liters of water daily and I try to stop eating salty snacks by 8 pm. The next morning, my skin looks noticeably calmer when I do this.
I also stopped washing my face with hot water. Hot water strips the barrier and makes everything dull. I use lukewarm water for cleansing and a cold splash at the end to close things up. This took my glow from about a 6 to a 9 with zero product change.
If you are new to this, do not buy everything at once. Start with one hydrating toner and see how your skin reacts for a week. Then add the moisturizer. The beauty of this budget routine is that you can build it slowly without wrecking your wallet, and your skin gets to adjust at its own pace.
The final step in the photo, that glossy pink lip and subtle eye, comes after the skincare has dried down completely. Give it 3 minutes. If you apply makeup onto a damp or sticky base, everything pills and slides. Set your face with a light mist or just a few pats with your palms. The natural finish you see in the picture is achievable with patience, not price tags.
So here is my soft challenge for you: pick one affordable toner, try the layering method for a week, and wear nothing but liner and gloss to see the difference. Then tell me your skin still needs the expensive stuff. I would love to hear what ends up working for your skin, so drop your favorite budget product in the comments or pin this routine to your skincare board for your next low-budget glam. 💕
Leave a Comment